Distributed cache service stuck in started & Provisioning on CA page

Hello Readers,

As per Previous article, i tried to explain configuration of Distributed Cache in SharePoint 2013 environment. Same follows for Sp2016 as well:Planning and Configuring Distributed Cache Service || Part 2

Today in current article will try to explain & correct the issue encountered with Distributed Cache Service. Sometime it happen that Distributed Cache service stuck in starting/Stopping mode in services on server page on SharePoint. If you open Manage Services on farm page in SharePoint 2016 , DS service can show Provisioning.

"It can be due to the issue of DS service on any of the server it is configured"

I will not go in detail of configuration as it is same for 2013 & 2016 and can be seen in previous article. So the question of day is "How to bring it back to Healthy state?"

Open Sharepoint Management Shell & check the status:
Get-SPServiceInstance | ? {($_.service.tostring()) -eq "SPDistributedCacheService Name=AppFabricCachingService"} | select Server, Id, Status

So if the service is showing starting/stopping on any of configured server in CA page you can get status here:

So if the the service is showing stopped on any of the running server, then it need to be corrected:"But before trying remove command" understand that there would surely be a job associated which need to be cleared first. else you will get the below error:

So get the details of job: name of the job instance you can get from above error or you can get id from the server id status

$job = get-sptimerjob job-service-instance-75e8dd26-0c3c-49a5-8378-xxxxxxxxxxxxx
$job
$job.delete()

Once the job is deleted you need to delete the service instance from the server it has issues:
$svc = Get-SPServiceInstance -id 75e8dd26-0c3c-49a5-8378-xxxxxxxxxxxx
$svc
$svc.delete()

Run the services instance command again and see if it get cleared:

Get-SPServiceInstance | ? {($_.service.tostring()) -eq "SPDistributedCacheService Name=AppFabricCachingService"} | select Server, Id, Status

Once it is cleared you need to add the service back on same server again as the same when in healthy state, use the below command without mentioning server name as it will start on the server as per cache cluster itself.
On SP Management shell execute the command: Add-SPDistributedCacheServiceInstance

Run the services instance command again and you will see the services is added back with status "Online" and the new "32 bit id will be associated":

Get-SPServiceInstance | ? {($_.service.tostring()) -eq "SPDistributedCacheService Name=AppFabricCachingService"} | select Server, Id, Status

"Now the DS service is back to Healthy state with status online on the servers where it is configured"

"You will find the status on Sp2016 Manage services in farm as "Disable Auto Provision" instead of Provisioning"

**If you want to check the cache host you can check by running below command in sequence:
Use-CacheCluster
Get-CacheHost

If you liked this post, do like on Facebook at : https://www.facebook.com/Ashishsharepointblog

Feel free to Rate and provide feedback if you find post useful

Hope this help
Ashi

Posted in SharePoint 2013, SharePoint 2016 | Tagged , , , , , , , , , | Leave a comment

Coming Back After complete 3 Years

Friends/My Readers,

Its been a long i have been away from my blogging.When i see back Its exactly 3 yrs Today(30/July/2015 – 30/July/2018)

Neither I stop Learning in all these Years Nor do i stop writing.
Neither I stop to Gain Experience Nor do i stop my Ideology “Help and get Helped or If Helped, then help Others“.

The only thing i did is : stop sharing my technical learning’s to my Blog & Readers.

But Now , I assure will continue this regularly & make my habit.

Thanks for giving lot of Hits & reading to my Blog. Need your support & Pat again the same way….

Ashi..

Posted in Uncategorized | Tagged , , | Leave a comment

Planning and Configuring Distributed Cache Service || Part 2

Hi All,

As per the previous article, i have tried to create the understanding for Distributed Cache service : Understanding, Planning and Configuring Distributed Cache Service

In this current article will try to see with the planning and configuration of the DCS.

Planning & Capacity analysis of Distributed Cache Service:

At the time of SharePoint Installation , Distributed Cache service is by default assigned 10% of the total physical memory on the server. Distributed Cache service uses half (5% of total physical memory) of that memory allocation for data storage i.e. Cache Size, and the other half of that memory allocation is used for memory management overhead. When the cached data grows, Distributed Cache service uses the entire 10% of the allocated memory.

Cases in which Distributed Cache service memory allocation should be increased:

  • When physical memory is added to the server. Distributed Cache service will not recalculate the 10% memory allocation automatically, so Distributed Cache Services memory allocation have to be increased manually in case of  increase in total physical memory on the server.


  • Example to calculate memory assigned to Distributed Cache service when Server has a collocated Distributed Cache server.

1.    Determine the total physical memory on the server. For this example, we have 160 GB as the total physical memory available on the server.

2.    10% of the total physical memory is 16 GB .Reserve 2 GB of memory for other processes and services that are running on the cache host. For example, 16 GB – 2 GB = 14 GB. This remaining memory is allocated to the Distributed Cache service.

3.    Take half of the remaining memory, and convert it to MB. For example, 14 GB/2 = 7 GB or 7168 MB. This is the cache size of the Distributed Cache service.

4.    Use the following procedure to update the memory allocation accordingly.

For dedicated Distributed Cache service below method can be used to determine the cache size:Dstributed Cache Service

Configuring Distributed Cache

Collocated Mode: In normal or default circumstances distributed cache runs in a collocated mode and it require no extra configuration.

1) Installation of all pre-requisites of SharePoint 2013 are complete.

2) Install SharePoint Server 2013

3) Distributed Cache required on all servers in the farm

4) Use the SharePoint Products Configuration Wizard, psconfig.exe or PowerShell cmdlets.

Dedicated mode or hybrid mode: If you need a separate cache cluster, or a set up in which some computer act as a Cache host i.e Hybrid , distributed cache can be set up using powershell command , or you can run PSConfig.exe with the /skipRegisterAsDistributedCachehost flag on all servers that are not cache hosts.

1) Installation of all pre-requisites of SharePoint 2013 are complete.
2) Install SharePoint Server 2013
3) Distributed Cache is not required on all servers in the farm
4) Use psconfig.exe or PowerShell cmdlets to configure SharePoint and use command with the /skipRegisterAsDistributedCachehost parameter on all servers that are not cache hosts.
and
5) Use psconfig.exe or PowerShell cmdlets to configure SharePoint and use command without the /skipRegisterAsDistributedCachehost parameter on all servers that are cache hosts.

Changing a Non-Cache Host To a Cache-Host

At a later point of time in a farm if you need to change non cache host to cache host use the below command:

1) Add-SPDistributedCacheServiceInstance cmdlet on the cache host being added
2) Perform post configuration rechecks

Changing a Cache Host To a Non-Cache-Host

At a later point of time in a farm if you need to change cache host to non cache host due to any reason use the below command:

1) Remove-SPPDistributedCacheServiceInstance cmdlet  on the cache host changing to a non-cache host
2) Perform post configuration rechecks

Repairing a Cache Host

During installation, configuration, or maintenance activities, the Distributed Cache service may enter a non-functioning state. Report of issue in Distributed Cache service will appear in Health Rules in Central Administration or when users use features in SharePoint Server 2013 that rely on the Distributed Cache. Use the below command to restore to functioning state :

1)Run Get-SPServiceInstance to list all services for all servers in the server farm
Note the GUID from the ID property of the Distributed Cache service on the server you are repairing
2) Run the PowerShell code below
$service = get-spserviceinstance GUID
$service.delete()
where GUID is the GUID of the Distributed Cache service running on the server which has to be repaired.
3) Run Add-SPDistributedCacheServiceInstance to reinstall and start the Distributed Cache service on the cache host you are repairing.

Update a Cache Host Size

Whenever you want to increase the memory allocation of the Cache Host above the default requirement :

1) Stop the Distributed Cache service on all cache hosts on Central administration in Services on Server page.
2) Run the Update-SPDistributedCacheSize -CacheSizeInMB <CacheSize> cmdlet on any cache host
3) Restart the Distributed Cache service on all cache hosts on Central administration in Services on Server page.

Graceful Shutdown a Cache Server

There is only one copy of any item in the cache, So it is very important to carefully add and remove servers from the Distributed Cache cluster. The “graceful shut down” of a Cache Server in a Cache Cluster transfers any cache data to another Cache Server in the Cache Cluster from the server being removed.

To modify , repair or remove stop the distributed cache service gracefully.
Stop-SPDistributedCacheServiceInstance –Graceful

If you liked this post, do like on Facebook at : https://www.facebook.com/Ashishsharepointblog

Feel free to Rate and provide feedback if you find post useful

Hope this help
Ashi

To know about latest service pack and update on SharePoint. Please refer: Link

Posted in SharePoint 2013, SQLServerPedia, Uncategorized | Tagged , , , , , , , , , | 1 Comment

Understanding, Planning and Configuring Distributed Cache Service || Part 1

Hi All,

Major expectation raised by user for SharePoint other then Search ,is to have Good User Experience and Faster in it operation.

In Order to improve SharePoint User experience, Microsoft added a new feature called Distributed Cache service, it cache frequently requested information and made it available quickly to all the servers(Web Front end) in the farm. Distributed Cache can be used for quick data retrieval. It stores data in memory and does not have a dependency on databases in SharePoint Server 2013.

It is mainly used to facilitate Search and the new social features in SharePoint 2013, as both of these require fast access to vast amounts of information.

Fast retrieval from the in-memory caching of Distributed Cache Service will lowering the load on SQL Server. It is a feature that will be used mainly by large SharePoint farms. . If you plan to use activity feeds, Distributed Cache service must be enabled on the Sharepoint Farm. This cache temporarily stores the microblog entries to make it immediately available to others in the environment.

 Distributed Cache Service in SharePoint is the extension of Windows App Fabric which is a pre requisite in SharePoint 2013.

Benefit: Distributed Cache service holds context- and application specific information in memory, it eliminates the need to set the “sticky session” (or server affinity) on the network load balancer for SharePoint farms that have many SharePoint web Servers.

Why the need of sticky session is required in SharePoint 2010?

Distributed Cache Service cache login tokens . It is a big improvement over SharePoint 2010, which stored the login token on each Web front end server in the farm. “In SharePoint 2010, users who are redirected to a different load-balanced WFE often need to re authenticate when using SAML or FBA authentication if load balancer affinity, also called sticky sessions, is not enabled. Therefore, sticky sessions are no longer required with SharePoint 2013.”

Some of the features that use the Distributed Cache service:
➤ All social features
➤ Collaboration features
➤ Authentication
➤ OneNote client access
➤ Security trimming
➤ Page load performance

Note: Distributed Cache does not replace other “caches” within SharePoint, such as BLOB cache and Output cache as they are required specific to their need.

Server that is running the Distributed Cache service is called cache hosts. When one or more servers of the SharePoint farm runs the Distributed Cache service it create a Cache Cluster . The total cache size for the server farm is the sum of the memory allocated to the Distributed Cache service on each cache host. There is only ever one copy of an item in the cache. Data is not duplicated or copied on other cache hosts in the cache cluster. Therefore cache cluster cannot be configured for High Availability.

Distributed Cache service can be deployed in two modes:
1) Dedicated mode
2) Collocated mode.

In dedicated mode, No other service runs on SharePoint Services on Server other than Distributed Cache service . In collocated mode, Distributed Cache service runs along with other services on SharePoint server. It is always recommended to deploy Distributed Cache service in Dedicated mode.

Distributed Cache service is a memory intensive service. It is not recommended to run following services on same server running Distributed Cache service.: Search Services, Project Server service, SQL Server, Excel Services.

If a server running Distributed Cache Service (cache host) & the server utilization reaches 95%, DCS will start throttle itself and will no longer accept new read or write requests until the utilization falls below 70%. It doesn’t mean that user will not get their data, it means SharePoint will then request the information from the SQL server.

I will try to explain planning and Configuration of Distributed Cache service in my next article..

If you liked this post, do like on Facebook at : https://www.facebook.com/Ashishsharepointblog

Feel free to Rate and provide feedback if you find post useful

Hope this help
Ashi

To know about latest service pack and update on SharePoint. Please refer: Link

Posted in SharePoint 2013, Uncategorized | Tagged , , , , , , , , , , , , | 1 Comment

Difference of Index Partition and Creating Service application in partitioned Mode

Hi All, 

I am sharing the response and question which I received on my mail based on past post : “Configure search topology in scale out mode in SharePoint 2013”  .

What I received is “If we are using index partition and replica, then why we are not creating Search service application in Partitioned Mode” . and shared me with a link of some other blog.

So what is the in and out of that is:

  1. There might that readers relate Index partition with Search Service application in Partitioned mode.
  2. It also might be possible that some experts combined and created Search Application in partitioned mode and Index partition in single Blog.

None of the above possibilities is wrong nor the experts blogs. But to clear the things is the main aim of this post.

So what is this Partitioned mode, Let’s understand with 2 examples:

  1. Suppose we have Search service application and metadata service application . If other division want separate metadata and search service, we create the same. But what to be done , If every other department want it separate service. In that case we will Create “Partitioned Service Application” . Which help us to create data separate in spite of using single service application and same database.

  2. Secondly if we are using Hosted SharePoint or SharePoint Online and we want separate search for every Tenant based on Site Subscription. In that case also we will create a Partitioned Service application.

This is what referred as Multi Tenancy in SharePoint.

Example of Creating a search application in partitioned mode. It just needed to add a switch (Partitioned) using PowerShell


To Create Search Service Application
$SPServiceApplication = New-SPEnterpriseSearchServiceApplication -Name $SPSearchServiceName -ApplicationPool “Learning\Test1” -DatabaseName $SPDatabaseName -Partitioned

To Create Search Service Application Proxy
New-SPEnterpriseSearchServiceApplicationProxy -Name $SPSearchServiceProxyName -SearchApplication $SPServiceApplication –Partitioned

For reference of this command you can refer the post: “How to Configure Search in SharePoint 2013”.

Note: Although Non-Partitioned service application can be created using CA or PowerShell. But Partitioned service application can be created only with PowerShell.

Now what is Index Partition and Replica

Index Architecture(component) is divided into Index Partition and Index Replica. Index can be divided into index partition or called as discrete portion which is stored in disk. It enable scaling in two ways:

  1.  Index partition are added to handle the Crawl load or Crawl Volume. It can be created based on your crawl volume of data.
  2. Index Replica are added to handle the Query load or volume. So if you are getting large query load you can create replica accordingly.

Hope, I am able to explain the difference between Index Partition and creating service application in Partitioned mode.

If you liked this post, do like on Facebook at : https://www.facebook.com/Ashishsharepointblog

Feel free to Rate and provide feedback if you find post useful

Hope this help
Ashi

Posted in SharePoint 2013 | Tagged , , , , | Leave a comment

Configure Search Topology in ScaleOut Mode in SharePoint 2013 || Configure Search Service in SharePoint 2013

Hello Friends,

With a New Year and my earlier commitments. Below is the way to configure Search Service 2013 in Scale out mode.

Search Service configuration 2013 in Standalone mode can be viewed at: “How to Configure Search in SharePoint 2013”

 As described earlier, Microsoft is focusing more and more on Power Shell and this is what is done with Search in SharePoint 2013. Graphical interface in SharePoint Search application is not available. We cannot create and edit topology from Central administration. Only option is to use Power Shell.

We already have Search service Application, Proxy and Search and index component created in earlier post. To configure in scale out mode:

  • We just need to modify existing topology by making a clone. Or
  • Create a new topology with all components again.

There is no need to create Search service application and proxy again. As earlier was standalone I would prefer to create new topology.

But in production or already scale out mode it is preferred to modify the existing topology by making a clone of it. As we have to take care of:

Index component addition and removal, keeping in mind of search.

Removal and addition of Replica accordingly.

For current scenario:

  • We are using 4 servers which are holding(Admin, Crawl, Content, Analytics, Query & Index) in Redundant basis.
  • As per Microsoft Guidelines:
    Content Processing and Analytics processing should be together.
    Administration and crawl should be together.
    Index and query processing should be together.

So we would be configuring the search as per below description:

Description Of servers

Below are the directs commands for very component to be created:
Server Names
$AppServer1 = “servr2012-sql”
$AppServer2 = “servr2012-1”
$AppServer3 = “servr2012-2”
$AppServer4 = “servr2012-3”


Starting the Search service instance
Start-SPEnterpriseSearchServiceInstance $AppServer1 -ErrorAction SilentlyContinue
Start-SPEnterpriseSearchServiceInstance $AppServer2 -ErrorAction SilentlyContinue
Start-SPEnterpriseSearchServiceInstance $AppServer3 -ErrorAction SilentlyContinue
Start-SPEnterpriseSearchServiceInstance $AppServer4 -ErrorAction SilentlyContinue

Starting the query and site setting Service Instance
Start-SPEnterpriseSearchQueryAndSiteSettingsServiceInstance $AppServer1 -ErrorAction SilentlyContinue
Start-SPEnterpriseSearchQueryAndSiteSettingsServiceInstance $AppServer2 -ErrorAction SilentlyContinue
Start-SPEnterpriseSearchQueryAndSiteSettingsServiceInstance $AppServer3 -ErrorAction SilentlyContinue
Start-SPEnterpriseSearchQueryAndSiteSettingsServiceInstance $AppServer4 -ErrorAction SilentlyContinue
Creating a New Topology with Search service Application
$searchapplication = Get-SPEnterpriseSearchServiceApplication
$newTopology = New-SPEnterpriseSearchTopology -SearchApplication $searchapplication

$AppInstance1 = Get-SPEnterpriseSearchServiceInstance -Identity $AppServer1
$AppInstance2 = Get-SPEnterpriseSearchServiceInstance -Identity $AppServer2
$AppInstance3 = Get-SPEnterpriseSearchServiceInstance -Identity $AppServer3
$AppInstance4 = Get-SPEnterpriseSearchServiceInstance -Identity $AppServer4


Creating the search components on appropriate servers:
New-SPEnterpriseSearchAdminComponent –SearchTopology $newTopology -SearchServiceInstance $AppInstance1
New-SPEnterpriseSearchContentProcessingComponent –SearchTopology $newTopology -SearchServiceInstance $AppInstance1
New-SPEnterpriseSearchAnalyticsProcessingComponent –SearchTopology $newTopology -SearchServiceInstance $AppInstance1
New-SPEnterpriseSearchCrawlComponent –SearchTopology $newTopology -SearchServiceInstance $AppInstance1


New-SPEnterpriseSearchAdminComponent –SearchTopology $newTopology -SearchServiceInstance $AppInstance3
New-SPEnterpriseSearchContentProcessingComponent –SearchTopology $newTopology -SearchServiceInstance $AppInstance3
New-SPEnterpriseSearchAnalyticsProcessingComponent –SearchTopology $newTopology -SearchServiceInstance $AppInstance3
New-SPEnterpriseSearchCrawlComponent –SearchTopology $newTopology -SearchServiceInstance $AppInstance3


Creating the Index and Query component:
New-SPEnterpriseSearchQueryProcessingComponent –SearchTopology $newTopology -SearchServiceInstance $AppInstance2
New-SPEnterpriseSearchIndexComponent –SearchTopology $newTopology -SearchServiceInstance $AppInstance2 -IndexPartition 0
New-SPEnterpriseSearchIndexComponent –SearchTopology $newTopology -SearchServiceInstance $AppInstance4 -IndexPartition 0


New-SPEnterpriseSearchQueryProcessingComponent –SearchTopology $newTopology -SearchServiceInstance $AppInstance4
New-SPEnterpriseSearchIndexComponent –SearchTopology $newTopology -SearchServiceInstance $AppInstance2 -IndexPartition 1
New-SPEnterpriseSearchIndexComponent –SearchTopology $newTopology -SearchServiceInstance $AppInstance4 -IndexPartition 1


To set New search topology as an active one
Set-SPEnterpriseSearchTopology -Identity $newTopology
Get-SPEnterpriseSearchServiceApplication -searchapplication $searchapplication

Topology New

Search Topology

Search Topology


I have created a topology for 4 Servers. It can be scaled as per the Crawl volume and Query volume .

If you liked this post, do like on Facebook at:https://www.facebook.com/Ashishsharepointblog


Feel free to Rate and provide feedback if you find post useful

Hope this help
Ashi

Posted in SharePoint 2013, SQLServerPedia, Uncategorized | Tagged , , , , , , , , | 1 Comment

2014 in review

The WordPress.com stats helper monkeys prepared a 2014 annual report for this blog.

Here’s an excerpt:

The concert hall at the Sydney Opera House holds 2,700 people. This blog was viewed about 19,000 times in 2014. If it were a concert at Sydney Opera House, it would take about 7 sold-out performances for that many people to see it.

Click here to see the complete report.

Posted in Uncategorized | Leave a comment

How to Configure Search in SharePoint 2013 || Configure Search Topology in SharePoint 2013

Hello Friends,

I was getting lot of responses on blogs and mails. It will be difficult to cover all at once . So covering today the latest one “How to Configure Search in SharePoint 2013” and in Standalone server.

Microsoft is focusing more and more on Power Shell and this is what is done with Search in SharePoint 2013. Graphical interface in SharePoint Search application is not available. We cannot create and edit topology from Central administration. Only option is to use Power Shell.

Till SharePoint 2010 we have the option to configure and scale Search Service application using Central administration.

There is not much difference to configure Search in Standalone or farm mode. The thing in Farm mode is to scale out the all the component except (Search Admin Component) as it cannot be scaled out and the other is to create it in partitioned mode.

To Create Search in Farm and scale out mode. I will write the same after this article.

List of Components which need to be kept in mind while creating and Configuring Search Service Application are:

  1. To create a SharePoint Search Service Application( This is the only part which can also be done using Central Administration)
  2. To Create a SSA(Search Service Application) Proxy( It will be created automatically using GUI but need to create manually using Power Shell)
  3. Component of Search: Search administration component, Content processing Component, Crawl Component, Query component & web analytics(which is separate service application in SP 2010)
  4. Creating or scaling Index component and Index replica.

Below are series of steps to create and configure Search Service and its Topology using PowerShell.

Ex:
My SharePoint server name: servr2012-sql

To Create a Search application we need: An Application Pool, A service account for app pool.

Below Snippet will create a Search Service application or SSA in short:
Open SharePoint Management Shell with Administrator permission.


$AppServer = “servr2012-sql”
$SPSearchAppPoolName = “Search_App”
$SPSearchAppPoolAccount = “learning\test1”
$SPSearchServiceName = “SharePoint Search Service Application”
$SPSearchServiceProxyName = “SharePoint Search Service Application Proxy”
$SPDatabaseName = “SharePoint-Search-db”


To Create a Search Service Application Pool
$AppPool = New-SPServiceApplicationPool -Name $SPSearchAppPoolName -Account $SPSearchAppPoolAccount -Verbose

To start Search Service Instance on Application or Standalone Servers
Start-SPEnterpriseSearchServiceInstance $AppServer -ErrorAction SilentlyContinue
Start-SPEnterpriseSearchQueryAndSiteSettingsServiceInstance $AppServer -ErrorAction SilentlyContinue

Below is screenshot, which service are started with above command:
SearchServiceInstanceSearch Service Instance--Ashish banga

SearchQueryAndSiteSettingsService
Search Query And Site Settings Service Instance--Ashish banga


To Create Search Service Application
$SPServiceApplication = New-SPEnterpriseSearchServiceApplication -Name $SPSearchServiceName -ApplicationPool “Learning\Test1” -DatabaseName $SPDatabaseName

To Create Search Service Application Proxy
New-SPEnterpriseSearchServiceApplicationProxy -Name $SPSearchServiceProxyName -SearchApplication $SPServiceApplication


Till this part you can also do with GUI Central admin. You will find 3 Service application in the list, below is screenshot for the same.

SharePoint Search Service Application Proxy--Ashish banga

Search Topology commandSearch Topology command-Ashish banga

Rest all configuration need to be done with power shell. With this a Search Topology is created and topology cannot be modified in active state. To create other component we need to create a clone of the current topology and work on it and once all things are finalized we can activate that topology.


Cloning the topology:
$Spclone = $SPServiceApplication.ActiveTopology.Clone()
$AppInstance = Get-SPEnterpriseSearchServiceInstance -Identity $AppServer


Now the clone is created and we can start creating other Search Components:


To create admin component
New-SPEnterpriseSearchAdminComponent –SearchTopology $Spclone -SearchServiceInstance $AppInstance

To Create content processing component
New-SPEnterpriseSearchContentProcessingComponent –SearchTopology $Spclone -SearchServiceInstance $AppInstance

To create Analytics processing component
New-SPEnterpriseSearchAnalyticsProcessingComponent –SearchTopology $Spclone -SearchServiceInstance $AppInstance

To Create crawl component
New-SPEnterpriseSearchCrawlComponent –SearchTopology $Spclone -SearchServiceInstance $AppInstance

To create Query processing component
New-SPEnterpriseSearchQueryProcessingComponent –SearchTopology $Spclone -SearchServiceInstance $AppInstance


As we are using Standalone environment there is no need for index partition and replica. We can directly create index component as others.
Note: For Scale out I will surely add a new article very soon.


$IndexprimaryLocation = “C:\Data”
New-SPEnterpriseSearchIndexComponent –SearchTopology $Spclone -SearchServiceInstance $AppInstance -RootDirectory $IndexprimaryLocation


Note: You have to create folder before using this command.

Search ComponentSearch Component-Ashish banga

As told earlier we have to activate this clone to show effect or have in place:
$Spclone.Activate()

It will take time to finalize the change, So you can enjoy for a while.

When all things are done we can verify our topology with below command.

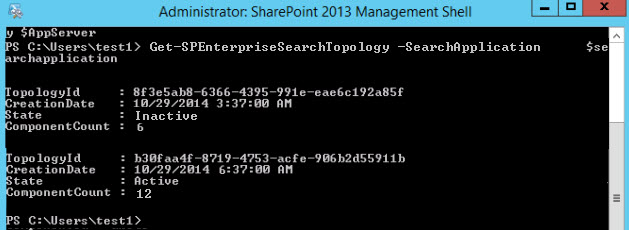
$searchapplication = Get-SPEnterpriseSearchServiceApplication
Get-SPEnterpriseSearchTopology -Active -SearchApplication $searchapplication

Below is the screenshot of activated component in the topology.

Topologytopology--Ashish banga

Goto your central admin and go to search application you will find your topology as below:

Search TopologySearch Toplogy--Ashish banga

I have created a topology on stand alone server but it is very easy to scale out your topology. In next section I will show to scale this same topology in N server farm.

If you liked this post, do like on Facebook at: https://www.facebook.com/Ashishsharepointblog

Feel free to Rate and provide feedback if you find post useful

Hope this help
Ashi

Posted in SharePoint 2013, SQLServerPedia | Tagged , , , , , | 10 Comments

Wishing You a Very Happy Diwali

Wishing You a Very Happy Diwali…………….

KAHI TIMTIMAHAT HAIN DIYO KI, KAHI SHOR HAAN ATHISBAZI KA

CHAMAK HAAN DIL MAIN, UMEEDO KI KHANAK HAAN

MITHAIYO KA ANAND HAAN, PATHAKO KI JHADI HAAN

YE JEET HAAN SACH KI, YE JASAN HAAN DIWALI KA

Happy Diwali- Ashish Banga


दीपावली : अर्थात  दीपो की अवली या दीपो की पंक्ति। दीपो द्वारा उत्साह, त्यौहार या स्वागत ही दीपावली है। इस दीपावली बल्बावली की जगह दीपावली मनाये । इस दीपवली दीपो को प्रज्जवलित करके दीपावली मनाये और इस रोजगार में अपना सहयोग दे।
माता लक्ष्मी आप सबके के परिवार को सुख समृद्धि और ज्ञान प्रदान करे ।
हैप्पी दीपावली


Ashi

Posted in Uncategorized | Leave a comment

Error while enabling NetFx3 feature || Alternate source path error

Hello Friends,
Life Is a struggle with Lot of If and buts. It’s being a many month I was out of touch with my blogging hunger. But there were lot of question which I was getting from time to time on my mails/blogs , which I will try to answer in couple of days or weeks.


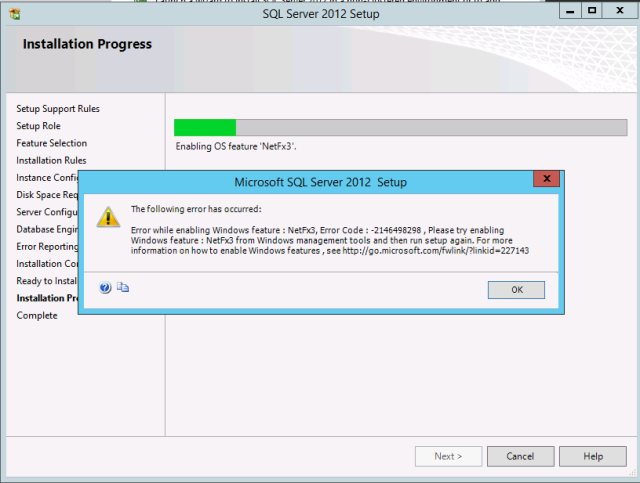
Few weeks back, there was some one asking about an specific error “Error while enabling Windows feature : NetFx3 “. I have seen the error earlier also but this time I was interested to find it cause. So, while working it seems that this error occurs with other name also. Some are:


  1. Error installing Microsoft .NET Framework 3.5==>  While installing .NET 3.5 features or it needed as prerequisite.installing .NET 3.5 
  2. Specify Alternate source Path? One or more installation selection are missing source path==>While Installing Active Directory Domain services.Active Directory Domain services
  3. Error while enabling Windows feature : NetFx3==> Error while installing Sql.Sql server 2012


So, What is this error and why the demon is coming with different names in diff ways.

Problem came out is: It turns out that Windows Server 2012 does not include NetFx3 when it is installing.  It doesn’t mean that it is gone, but it does have to be installed separately.  So here we go, It is coming on 2012 window server as we all are fond to learn new thing on new version.


What we have to do to resolve the issue. There are 2 ways to resolve the same:

  1. By using the GUI . All of us favorite way.
  2. Or the Command prompt


  • Insert the window 2012 CD or if using Virtual way(VMware/Hyper-v) attach the ISO file. Check the drive letter it assign . D: in this caseIso file


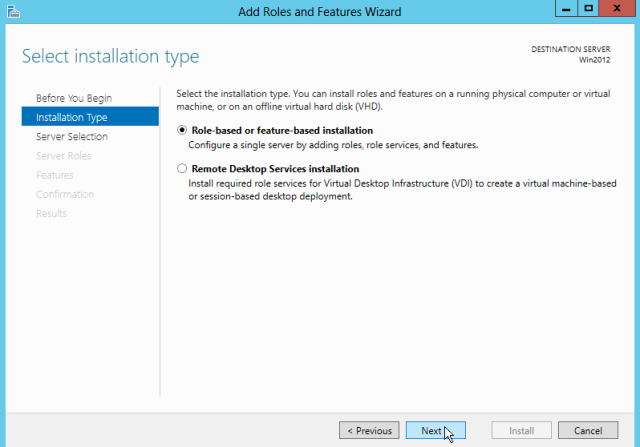
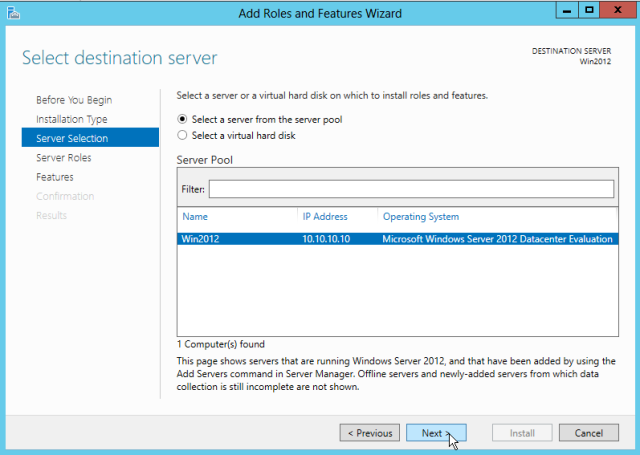
  1. Go to Server Manager==> Manage==> Add roles and feature.
  2. Select .NET framework 3.5 features
  3. Click next. You need to enter Alternate source pathActive Directory Domain services 
  4. It was D drive in our case. Click specify alternate source path and type: D:\Sources\SxS . It is the place where the bits are present and which doesn’t install while installing window 2012source path 
  5. Click ok and install. Your error will not occur


  • If you want to go with cmd prompt and type: dism /online /enable-feature /featurename:netfx3 /all /source:d:\sources\sxscommand prompt

If any of the 2 process are done your issue will be resolved.


If you liked this post, do like on Facebook at: https://www.facebook.com/Ashishsharepointblog


Feel free to Rate and provide feedback if you find post useful


Hope this help
Ashi

Posted in SharePoint 2013, SharePoint2010, SQLServerPedia, Window Server | Tagged , , , , , | 1 Comment

Installing and Configuring Active Directory in Window Server 2012

Hello Friends,

Sometimes life is so uneasy that you didn’t get time for the work which you like the most. Now those days are gone so I am back.It’s been months I haven’t written anything . I have received lot of mails through blogs and LinkedIn which I tried to reply.
Days are gone and now the pet command “DCPROMO” which is used to install Active directory is now the thing of past. But command can go not the concept.


So, How to Install Active Directory in Windows Server 2012?. I will try to provide exact way to install and configure Active Directory in new world.

Screen which comes when we use “dcpromo” to install AD.

dcpromo

This means we need to go to Server Manager to Install AD.

 Steps:

a) How to Install AD.

1) Go to Server Manager.
2) On the server manager page dashboard . Click on  Add roles and features.

server Manager

3) Roles and Features Wizard will open which will allow to add different roles and features in Window server. On the Default page , click next

Before you begin

4) Select Role based or feature-based installation. As we are installing role directly on a particular server and not on any env. remotely.

Installation Type

5)  Current server will come by default. Select the server and click next.

Destination server

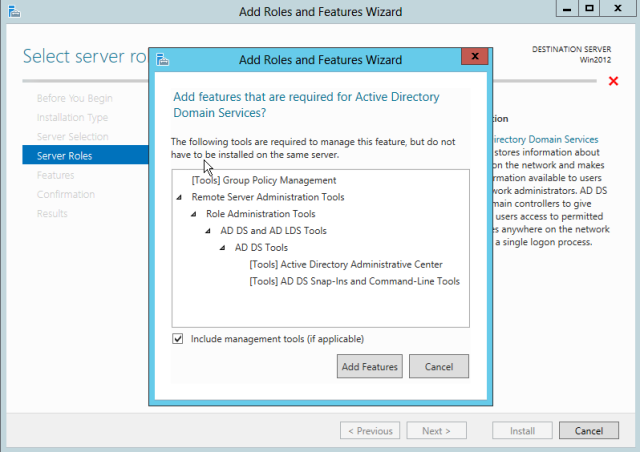
6) On the Server Role page select the Active Directory Domain Services. A list of additional things which are required with this will appear, select Add Features.

Add features

7) Select the features like .Net and Group policy Management. Scrolling down you will see the Remote server Administration tool is already selected as it is required with Active directory installation.

Features


8) Read the information given in AD DS page and click Next

ADDS

9) Read the DNS  information and click next.

DNS Server

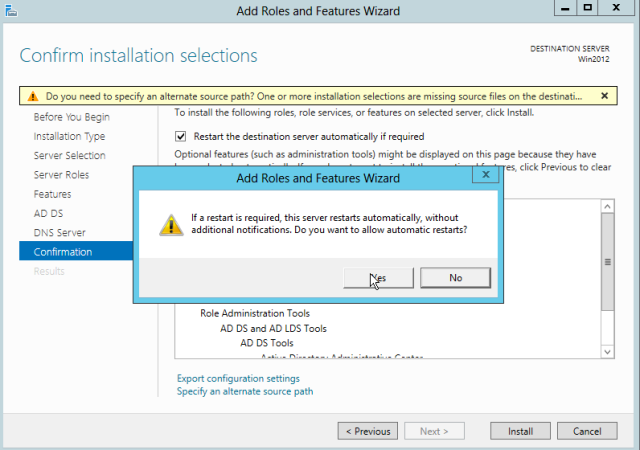
10) Select the restart the destination server check box and click Install.

Add Roles and Features

11) You are also export the Configuration settings which has been defined for future use.


12) Once AD DS is installed you can start configuration directly from result page “ Promote this server to domain controller”. It can also be done through Server Manager page.

Results

14) Close the wizard , once installation completes.


Steps:

b) How to Configure AD.


1) After AD DS role is installed it will be directly displayed on the ‘Server Manager’ page. For completing the configuration open the Notifications Pane by clicking on Notifications icon on the top of the Server Manager. click Promote this server to a domain controller.

Domain Controller

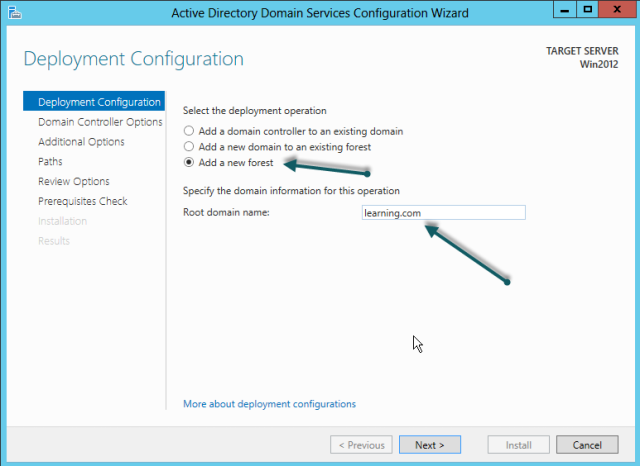
2) As we are creating a new forest . Select the option “Add New Forest” and provide the name of root domain. i.e in my case it is learning.com

Deployment Configuration

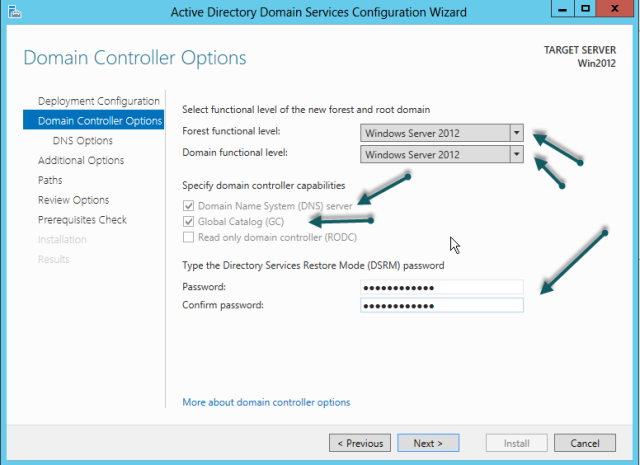
3) Select Forest functional level and Domain Functional Level. Here I am considering that all my servers are server 2012 . If there are server less than window server 2012. We should consider for backend Compatibility and level should be considered accordingly.


a) As it is the first Domain controller there is no option to check or uncheck . But for future ADC we need to check or uncheck these option as per need.


b) Kindly provide the DSRM password. It commonly known as passphrase earlier. Which is used while adding or removing any additional domain controller to have administrator authentication.

Note: Kindly note the password for future perspective.

Domain controller Option

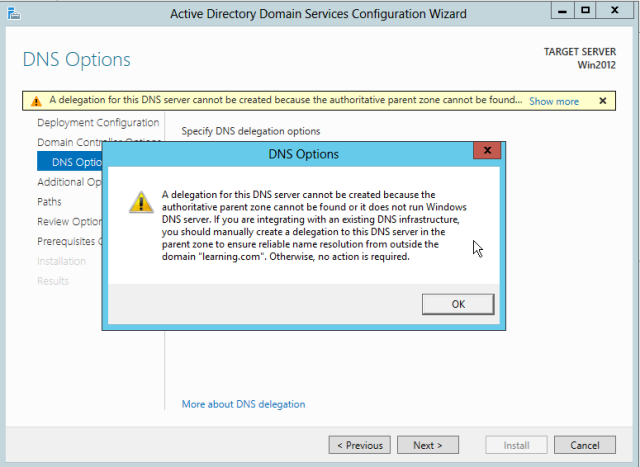
4) Read the below Warning and click Next. This warning is basically because of the Authoritative Zones which need to be created in DNS explicitly.

DNS Option

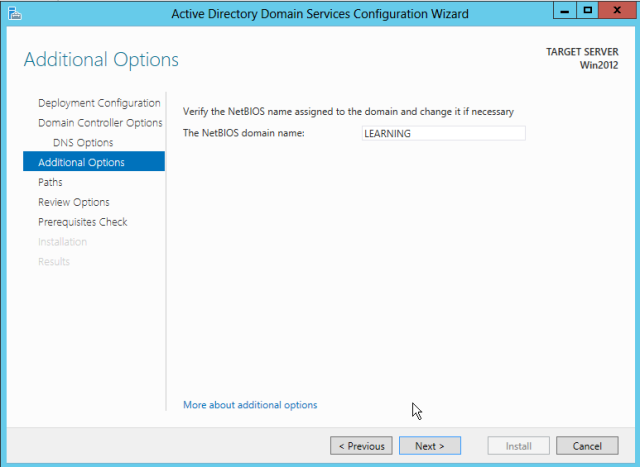
5) Provide the Netbios name of your domain in the field required. i.e Learning for our case.

Netbios name

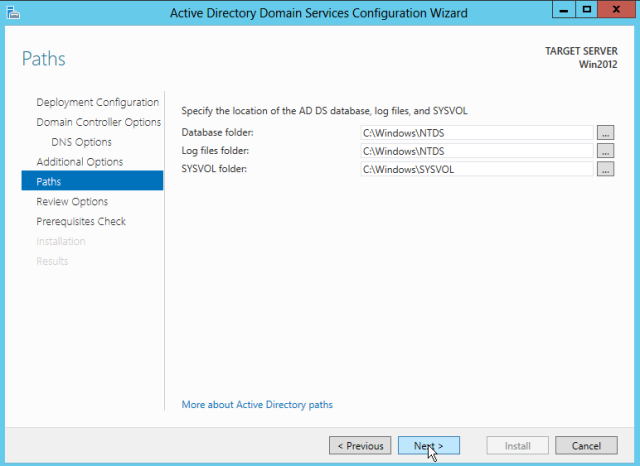
6) Specify the location of below NTDS and Sysvol file. By Default it is C: Drive.

ADDS path

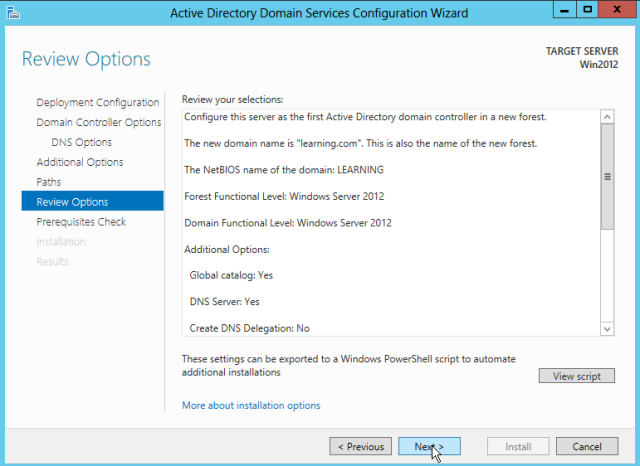
7) Read and acknowledge the below information before clicking Next.

ADDS Review

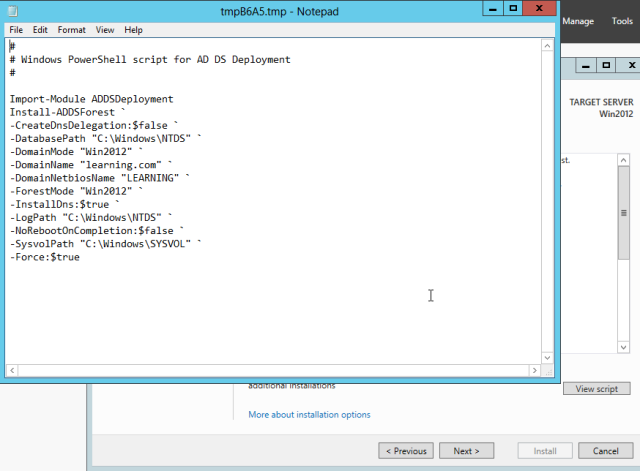
8) You can also view the script as what will be done during installation. Same can be done with power shell also.

Script ADDS

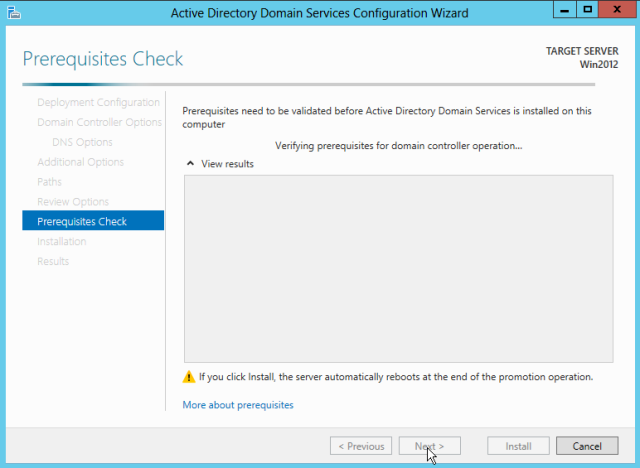
9) After the prerequisite check. Click on Install.

Prerequisite

10) After the installation is completed Successfully. Server will be Restarted and your Active Directory Domain Services is installed and configured on Windows Server 2012.


Hope I was able to describe the content correctly based on my knowledge and learning.

If you liked this post, do like on Facebook at :https://www.facebook.com/Ashishsharepointblog

Feel free to Rate and provide feedback if you find post useful

Hope this help
Ashi

Posted in SharePoint 2013, SQLServerPedia, Window Server | Tagged , , , , , | Leave a comment

How to Configure Form Base Authentication(FBA) in SharePoint Server 2010 Claim based using LDAP

Hello Friends,

It’s been months I haven’t written anything as I was busy with lot of stuff. There are many things to write but starting with topic for which I got many mails from lot of friends through blogs and linked in.

As we all are aware with Claim based in SharePoint 2010 and different option/ways of Authentication( Ldap, Sql, Federation). Claim is the technology of today, In SharePoint 13 Microsoft even removed the Classic  Mode and made it the days of past. Today we will discuss with the form based with LDAP Authentication.

 I will try to provide and exact way to configure Form based authentication in Claim Based Authentication in SharePoint. To enable a form based , web application should be created in Claim based mode only.

Steps:

Creating a Claims based web application using GUI

  • Go to Application Management in Central admin
  • Go to Manage Web Applications and create a new web application
  • In the option select Claims Based Authentication mode

web app creation1-Ashish Banga

  • In claim authentication types select Enable Windows Authentication and select NTLM
  • In authentication type section for  form based configuring select Enable ASP.NET Membership provider name.

    Note: Membership provider and Role manager name which you provide in this section will be used in everywhere for web config and enabling it. So give it properly and note it for reference.

  • Click on “OK” button to create the web application.
    web app creation2-Ashish Banga
  • web app creation3-Ashish Banga web app creation4-Ashish Banga
  • Now everybody knows web application is nothing until and unless there is at least a single site collection in it. So first create a site collection for it.
  • Go to CA, Application Management, Create site collections
  • Select the appropriate web application
  • Create a site collection with adding appropriate entries .
  • Now the task remain is to modify different web config files and adding user policy for the web application.
Modifying Web.Config files for the FBA web application , Central Administration and Secure Token Service

Note: All the web config entries for copying are provided at end of blog:

In the below web configs (for all ) 3 entries need to be added as per your entry:
1) one for Membership provider and Role manager name
2) Server name
3) Group Container. If you have access to AD you can find the container easily. Go to the AD . Select a user or a group in the container

AD1-Ashish Banga

AD2-Ashish Banga

Modifying web.config of the web application

  • Open the web.config file  of claim based web application’s
  • Find the <membership> entry. There should be only one membership entry and modification should be done in that only. Duplicity will give error.
  • Put the below XML directly under <Providers> entry
    webconfig-WP1-Ashishbanga
  • Find the <roleManager> entry.
  • Put the below XML directly under <Providers> entry.
    webconfig-WP2-Ashishbanga
  • Put the below entry in the People Picker Wildcards entry
    people picker-Ashishbanga

Modifying web.config of the Central Administration site

  • Open web.config file of  Central Administration site
  • Find the <system.web> entry
  • Put the following XML directly below it
    webconfig-CA-Ashishbanga
  • Put the below entry in the People Picker Wildcards entry
    people picker-Ashishbanga                            


Modifying web.config of the Security Token Service (STS) in 14 Hive

  • Open the web.config file  of Security Token Service (STS)
  • Find the </system.net> entry
  • Below full entry need to be added directly below </system.net> entry
    webconfig-secure store-Ashishbanga

Note: If you more than one SharePoint servers hosting Central Administration or the claims based web application then all web config entries need to be changed in all SharePoint servers.

Add a user policy to the web application

  • Go to CA, Application Management, Manage Web Applications
  • Highlight the claims based web application
  • Click on User Policy and select Add Users link
  • Click the Address Book icon. Type the login name to search. There will be two entries for same name one of AD and other for LDAP
  • Select the account from form authentication one in the User section and click the Add button
  • Give the Full Control access by checking that box. then click the Finish button
    LDAP1-Ashish Banga
    LDAP2-Ashish Banga

Now is the time for testing:

Open your web application in the browser. If all things are done fine. It will open like this:

Claim Based application1-Ashish Banga

Now click on sign in:

Claim Based application2-Ashish Banga

Now Your form based authenticated site will open for you:

Claim Based application3-Ashish Banga

Web config entries


Membership entry:
         <add name=”LdapMember” type=”Microsoft.Office.Server.Security.LdapMembershipProvider, Microsoft.Office.Server, Version=14.0.0.0, Culture=neutral, PublicKeyToken=71e9bce111e9429c” server=”server2008.ashish.com” port=”389″ useSSL=”false” userDNAttribute=”distinguishedName” userNameAttribute=”sAMAccountName” userContainer=”OU=CLAIM,DC=ASHISH,DC=COM” userObjectClass=”person” userFilter=”(ObjectClass=person)” scope=”Subtree” otherRequiredUserAttributes=”sn,givenname,cn” />

Role provider entry:
<add name=”LdapRole” type=”Microsoft.Office.Server.Security.LdapRoleProvider,  Microsoft.Office.Server, Version=14.0.0.0, Culture=neutral, PublicKeyToken=71e9bce111e9429c” server=”server2008.ashish.com” port=”389″ useSSL=”false” groupContainer=”OU=CLAIM,DC=ASHISH,DC=COM” groupNameAttribute=”cn” groupNameAlternateSearchAttribute=”samAccountName” groupMemberAttribute=”member” userNameAttribute=”sAMAccountName” dnAttribute=”distinguishedName” groupFilter=”(ObjectClass=group)” userFilter=”(ObjectClass=person)” scope=”Subtree” />

People picker entry:
<PeoplePickerWildcards>
<clear />
<add key=”AspNetSqlMembershipProvider” value=”%” />
<add key=”LdapMember” value=”*”/>
<add key=”LdapRole” value=”*”/>
</PeoplePickerWildcards>

Role Manager key for CA:
<roleManager enabled=”true” defaultProvider=”AspNetWindowsTokenRoleProvider” >

Hope I was able to describe the content correctly based on my knowledge and learning.

If you liked this post, do like on Facebook at :https://www.facebook.com/Ashishsharepointblog

Feel free to Rate and provide feedback if you find post useful

Hope this help
Ashi

Posted in SharePoint2010, SQLServerPedia | Tagged , , , , , , , , , , , , , , , , | 8 Comments

SQL Database connectivity|| SharePoint Configuration || Named Pipes Error In MOSS 2007

Hello Friends,

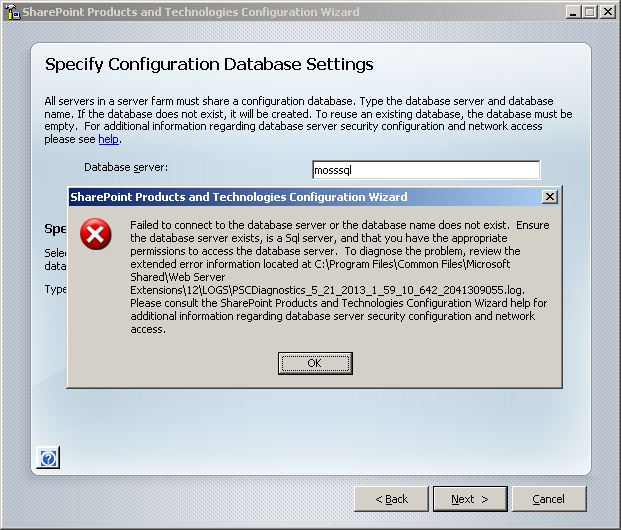
MOSS2007 is still live and sometime we need to check certain features and that can give learning too. Recently one of my friend was installing MOSS 2007 on his Virtual machine and during the configuration of the “SharePoint Configuration Wizard” he encountered an error while creating a new farm.

Ashish-Sql connec

Error is reflecting that SQL Server cannot be connected to the network, To diagnose it further we check lot of stuff:

  • VMware network settings.
  • IP addresses Provided to the servers were in the same subnet mask.
  • Any specific DNS issue.
  • able to ping IP address from both ends.
  • Non blockage of SQL port 1433 by firewalls.

It was my mistake and didn’t check PS config Diagnostic configuration error log at first in the 12 Hive. After spending some time and checking the log thoroughly. We got a log entry that “Named Pipes” might not be enabled on the SQL Server.

I check the Microsoft sites and there was no need for Named pipes as the connection are made through TCP socket but still I enabled Named Pipes on Sql server.

I tried the things again and this time it run without any error. It was success.

“Named Pipes” can be enabled as:

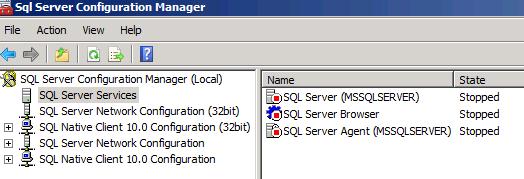
  1. Go to “SQL Server Configuration Manager”
  2. Go to “SQL Server 2005 Network Configuration”
  3. Go to “Protocols for MSSQLSERVER”
  4. Right-click the “Named Pipes” and “Enable” it.

If you uninstall and install sharepoint again or disable named pipes on same server configuration you will never get the error again. But if you create a new server VM and all configuration it will give same error. I have checked it but not sure why it gives error on new servers. Might be on fresh it needs named pipes to be enabled for a single time.

But nevertheless problem got resolved.

Hope I was able to describe the content correctly based on my knowledge and learning.

If you liked this post, do like on Facebook at: https://www.facebook.com/Ashishsharepointblog

Feel free to Rate and provide feedback if you find post useful

Hope this help
Ashi

Posted in MOSS 2007, SQLServerPedia | Tagged , , , , , , , , , , , , | 11 Comments

Connecting a service between Publishing and Consuming SharePoint 2010 farm

Hello Friends,

As discussed in my previous blog the new architecture of Service Application in 2010. Let’s today discuss about connecting two different farms: 

Connecting a service between Publishing and Consuming SharePoint farm

 There are some service applications which have the capability to Publish and which can be used by different SharePoint farms. What that actually means:

We all know Search and crawl is the most intensive task in SharePoint. If a company has 2-3 SharePoint farms and every farms runs its own search/index application. It will be very intensive and time consuming task. Instead of running index in every SharePoint Farm:

We can just do the index in one farm and use that publishing service in different farm. It will save lot of resources and will be very less intensive task.

So what to do next:

As we have other farm where some services are hosted locally as that cannot be published or consumed. So they reside in the same farm and we can consume the search application from the other farm. Below are the steps how to consume the publishing service from other farm:

 Note: To publish or consume the service applications, two farms should be in a far trust.

Once the farm-trust is configured, below are the steps:

Publishing a Service Application

a) Go to a publishing server whose service you want to publish and be used in other farms, open Central Administration.

b) Go to Application Management and then move to è Manage service applications.

c) Click to the right of the service application which you want to publish, clicking on application will open it features be sure to click on its right.

d) On the SharePoint Ribbon, click on Publish. Feature.

e) On the next page check the option “Publish this Service Application to other farms” .

f) Now we have to copy the whole url: It will begin with urn: and ends with .svc.

ex: urn:schemas-microsoft-com:sharepoint:service:ac51d6g73agg
96z8a6d89dg45fk972c243dbec93f0c7#authority=urn:uuid:da764
dko856wgbvfk86542564757&authority=https://xyz:2500/Topolo
gy/topology.svc

g) Make it ok and proceed.

h) Again do the same step as step C.

i) On the SharePoint Ribbon, click on Publish. Feature.

j) Provide farm Id of the consuming farm, you can find as:   Get-SPFarm | Select Id

k) Add the same.

l) Click the farm id you entered, for the permission.

Now the part of publishing farm is over, we have to enter the url in the consuming farm to use the service:

a) Go to a Consuming server where publishing service needs to be used, open Central Administration.

b) Go to Application Management and then move to manage service applications.

c) On the SharePoint Ribbon, click on Connect.

d) Pass the URL for the service application you have taken in step (f) of publishing server and press OK.

e) Highlight the service application by clicking on it.

f) Here you have an option to can choose, whether or not to include this service application in the default service application group. Click OK once done.

Now when all the stuff is over you can use the service application of a farm just as a locally hosted service application of your farm.

Hope I was able to describe the content correctly based on my knowledge and learning.

If you liked this post, do like on Facebook at: https://www.facebook.com/Ashishsharepointblog
Feel free to Rate and provide feedback if you find post useful

Hope this help

Ashi


Posted in SharePoint2010, SQLServerPedia | Tagged , , , , , , , , , , , , , , , | 1 Comment